As software systems continue to grow in complexity, Quality Assurance teams face increasing pressure to deliver faster releases without compromising quality. While automation frameworks have significantly reduced manual testing effort, many QA activities still remain repetitive and time-consuming. Test case creation, script development, execution, failure triage, maintenance, and reporting often consume a large portion of a QA engineer’s time.
What if AI could actively participate throughout the testing lifecycle rather than simply assist with code generation?
The result was an AI-powered QA automation ecosystem that combines AI-generated test cases, intelligent automation agents, browser-driven validation, automated failure analysis, and self-healing capabilities. The objective was simple: reduce manual effort across the testing lifecycle while allowing QA engineers to focus on exploratory testing, edge cases, and quality strategy.
This initiative has transformed how our teams approach test automation, enabling faster automation development, improved traceability, and reduced maintenance overhead.
The Challenge
Traditional automation frameworks solve only part of the problem.
Even with modern automation tools, teams still spend significant time on:
- Understanding requirements and identifying test scenarios
- Creating and reviewing test cases
- Writing and maintaining automation scripts
- Updating scripts when application changes occur
- Analyzing failed executions
- Distinguishing script failures from genuine application defects
- Maintaining traceability between requirements, test cases, and automation assets
- Verifying automation coverage against business requirements
- Updating test execution results in test management systems
As release cycles become shorter and applications evolve rapidly, these activities can become bottlenecks that impact delivery timelines and overall team productivity.
We wanted to build a framework that could automate not only test execution but also the decision-making workflows surrounding it.
AI-Powered QA Architecture
To achieve this, we combined AI-powered capabilities with our Playwright automation framework, enabling intelligent automation across test generation, script creation, execution, validation, maintenance, and reporting.
Core Technology Stack
Xray Test Management
Xray serves as the foundation of our testing process. Leveraging its AI-powered test generation capabilities, we generate initial test cases directly from Jira user stories and maintain end-to-end traceability throughout the testing lifecycle.
In addition to test case management, our automation framework integrates with Xray APIs to automatically publish execution results after every test run. This ensures that requirements, test cases, automation assets, and execution outcomes remain synchronized within a single system of record.
Playwright (TypeScript)
Our primary automation framework for end-to-end testing. Playwright provides reliable browser automation, cross-browser support, tracing, screenshots, videos, and rich debugging capabilities.
Kiro AI
Kiro serves as the central AI-powered development environment used to build and operate our AI-assisted QA workflows. Through carefully designed prompts and agent-driven workflows, Kiro enables automation script generation, script verification, debugging, execution support, and maintenance activities.
Playwright MCP (Model Context Protocol)
Playwright MCP enables AI agents to interact directly with a live browser. Agents can navigate pages, execute business workflows, inspect UI elements, capture screenshots, and gather contextual information required for automation generation and validation.
Jira MCP Integration
Jira MCP provides AI agents with direct access to Jira stories, acceptance criteria, linked test cases, and preconditions. This ensures automation remains aligned with business requirements while eliminating manual effort in requirement analysis.
Framework Design Principles
Our automation framework follows proven engineering patterns and best practices:
- Page Object Model (POM)
- Reusable BasePage architecture
- API abstraction layers
- Centralized test data management
- Dynamic runtime data generation
- Automated result synchronization with Xray
- Automated failure classification
The real innovation, however, lies in how AI is integrated into the workflow to automate tasks traditionally performed by QA engineers.
Meet the AI Components Driving the Framework
This approach combines Xray’s AI-powered test generation capabilities with specialized AI agents that automate script creation, validation, execution, failure analysis, and maintenance. Each component plays a focused role in reducing manual effort across the testing lifecycle.
Xray AI Test Generation
The journey begins inside Xray. When a user story is created in Jira, Xray’s AI capability analyzes the requirements and generates an initial set of test cases.
This provides:
- Faster test case creation
- Better coverage of acceptance criteria
- Consistent test documentation
- Direct traceability to Jira requirements
These AI-generated test cases become the foundation for the downstream automation workflow.
Test Generator Agent
Once the test cases are available, the Test Generator Agent takes over.
The agent:
- Reads Jira stories and linked Xray test cases
- Understands preconditions and acceptance criteria
- Executes workflows directly in the browser using Playwright MCP
- Captures UI interactions and application behavior
- Generates Playwright automation scripts
- Applies Page Object Model standards
- Creates appropriate assertions
- Updates test data configurations
Generated scripts align with framework standards from the beginning, significantly reducing manual scripting effort.
Test Script Verifier Agent
Generating automation is only part of the challenge. Ensuring that automation accurately reflects business requirements is equally important.
The Test Script Verifier Agent performs continuous validation by:
- Comparing generated scripts against linked test cases
- Identifying missing validations
- Detecting missing test steps
- Verifying assertion coverage
- Updating automation where gaps exist
- Re-executing tests for validation
This helps maintain alignment between requirements, test cases, and automation assets throughout the project lifecycle.
Test Executor & Healer Agent
Execution is no longer a passive activity.
When a suite runs, the agent:
- Executes all tests
- Isolates failures
- Investigates root causes
- Identifies selector changes
- Detects synchronization issues
- Resolves script-related failures
- Re-validates repaired tests
- Marks genuine application defects for review
This creates a feedback loop where automation continuously improves itself during execution.
Failure Analyzer
Not every failed test indicates a product defect.
To address this, we built a Failure Analyzer that classifies failures into three categories:
Script Issues
- Selector not found
Examples include:
- Strict mode violations
- Navigation timeouts
- Assertion mismatches
- Synchronization failures
Application Bugs
Examples include:
- Server-side failures
- Functional regressions
- Validation failures
- Broken business workflows
Needs Investigation
Examples include:
- Ambiguous failures
- Environment instability
- External dependency issues
This dramatically reduces the time engineers spend reviewing logs and diagnosing failures.
End-to-End AI Workflow
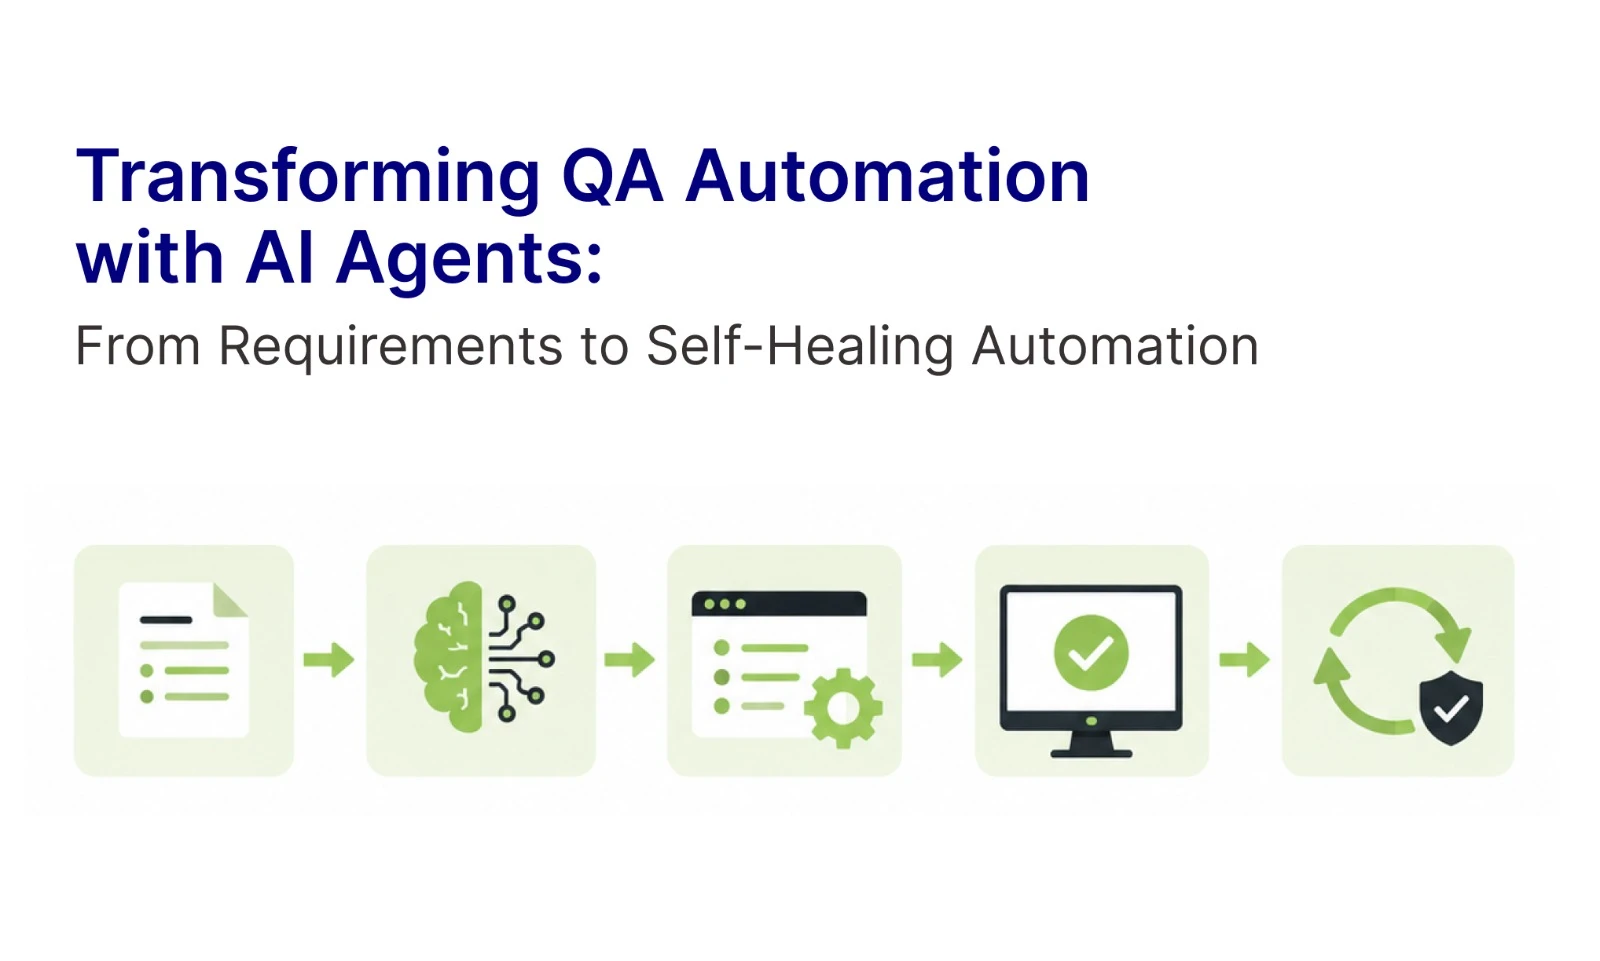
The complete workflow can be visualized as a continuous quality pipeline where AI participates at every stage.
Step 1: Jira Story → Xray AI Test Cases
A user story is created in Jira. Xray AI analyzes the requirements and automatically generates test cases linked to the requirement.
↓
Step 2: Test Cases → AI Script Generation
The Test Generator Agent reads the Jira story and linked test cases, executes the workflow in a live browser using Playwright MCP, and generates Playwright automation scripts following framework standards.
↓
Step 3: Script Verification
The Test Script Verifier Agent validates that generated scripts fully cover the test case requirements and fills any identified gaps. Rather than simply reporting discrepancies, the agent actively fixes identified gaps and enhances the automation suite to ensure complete alignment with the original test case requirements.
↓
Step 4: Test Execution & Self-Healing
The Test Executor & Healer Agent executes the automation suite, captures execution artifacts, investigates failures, identifies script-related issues, and applies automated fixes wherever possible. It then re-executes affected tests and performs regression re-validation to ensure stability, improving automation reliability while reducing maintenance effort.
Step 5: Results Published to Xray
Upon completion of execution, the framework automatically posts test results to Xray using Xray APIs. This maintains end-to-end traceability between Jira stories, Xray test cases, automation scripts, and execution outcomes.
↓
Step 6: Failure Analysis
The Failure Analyzer evaluates failures and categorizes them as script issues, application defects, or investigation-required cases.
Reusable AI Workflows
To make adoption simple across teams, we converted common QA activities into reusable prompts that any team member can invoke. These workflows cover the complete testing lifecycle—from requirement analysis to test execution and result reporting.
Generate Test Cases for a Story
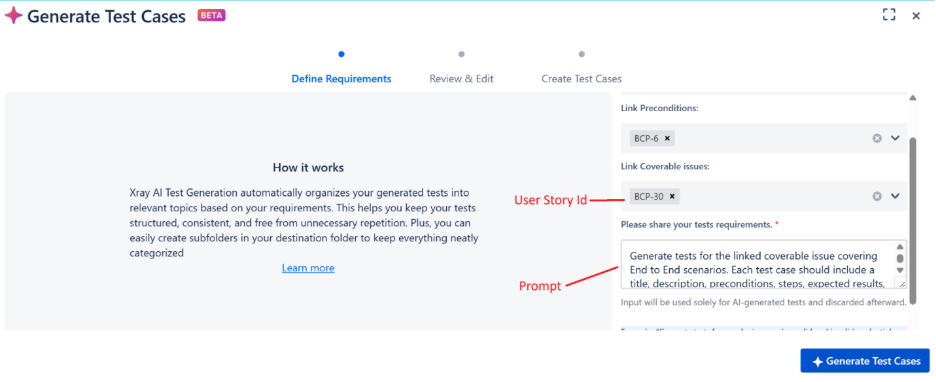
The workflow:
- Reads the Jira user story
- Analyzes acceptance criteria and requirements
- Uses Xray AI capabilities to generate test cases
- Links generated test cases back to the Jira story
- Establishes initial requirement traceability
This significantly reduces the effort required to create and maintain manual test cases.
Generate Automation for a Story
Agent System Prompt:
# Story Automation Execution
Execute the following workflow for any Jira story:
## Workflow
1. **Read Jira Story**: Fetch story {STORY_ID}, linked test cases, and preconditions
2. **Execute in Browser**:
- Login with precondition credentials
- Navigate per story path
- Execute each test case manually
- Capture network API calls
- Take screenshots
3. **Generate Scripts**:
- UI: Page objects + test specs
- Update testData.json
4. **Validate**: Ensure all scripts compile and follow framework patterns
## Test Data Rules
– **Static** (JSON): Credentials, URLs, fixed values
– **Dynamic** (Generator): Unique names, codes, timestamps
## Framework Compliance
– Page Object Model
– TypeScript
– TestDataLoader + DataGenerator
– Minimal code
– Proper assertions
– spec file should not contain the element locators. All element locators should be strictly maintained in the page objects only.
User Prompt: #test-generator-agent – Read and understand the User story BCP-30. Identify ‘end to end’ test cases linked to that user story. Execute those test cases using playwright MCP and at the end generate playwright Automation scripts within the existing framework
The workflow:
- Reads the Jira story
- Retrieves linked Xray test cases
- Understands preconditions and acceptance criteria
- Executes the workflow in a live browser using Playwright MCP
- Captures UI interactions and application behavior
- Generates Playwright automation scripts
- Applies framework standards and Page Object Model patterns
- Creates assertions and test data configurations
What traditionally required hours of manual scripting can now be completed in minutes.
Verify Automation Coverage
Agent System Prompt:
“# Test Script Verification and Alignment
Verify generated test scripts align with test case requirements and fix any gaps.
## Verification Process
### Step 1: Load Test Case Requirements
1. Read the test case document/story
2. Extract all steps from acceptance criteria
3. List all expected validations
4. Note any preconditions or test data requirements
### Step 2: Analyze Generated Script
1. Read the generated test script
2. Map each script action to test case steps
3. Identify implemented validations
4. Check for missing steps or assertions
### Step 3: Gap Analysis
**Check for Missing Elements:**
– ❌ Missing navigation steps
– ❌ Missing input actions
– ❌ Missing button clicks
– ❌ Missing validations/assertions
– ❌ Missing wait conditions
– ❌ Missing test data setup
– ❌ Missing cleanup actions
**Check for Incorrect Implementation:**
– ⚠️ Wrong selector usage
– ⚠️ Incorrect assertion logic
– ⚠️ Wrong test data
– ⚠️ Missing error handling
– ⚠️ Incomplete validation
### Step 4: Comparison Matrix
| Test Case Step | Script Implementation | Status | Action Required |
|—————-|———————-|——–|—————–|
| Step 1: Login | ✅ Implemented | Pass | None |
| Step 2: Navigate | ❌ Missing | Fail | Add navigation |
| Step 3: Fill form | ✅ Implemented | Pass | None |
| Step 4: Validate error | ❌ Missing | Fail | Add assertion |
### Step 5: Fix and Re-execute
**If Gaps Found:**
1. Update script with missing steps
2. Add missing validations
3. Re-run test in headed mode
4. Verify all steps execute correctly
5. Confirm all assertions pass
**If Script Complete:**
1. Run final verification
2. Mark as aligned
3. Document coverage
## Verification Checklist
### Navigation
– [ ] Login implemented
– [ ] Menu navigation to feature
– [ ] Page load verification
### Actions
– [ ] All input fields filled
– [ ] All buttons clicked
– [ ] All dropdowns selected
– [ ] All checkboxes/radios handled
### Validations
– [ ] Field value assertions
– [ ] Error message validations
– [ ] Success message checks
– [ ] Data persistence verification
– [ ] UI state validations
### Test Data
– [ ] Static data loaded correctly
– [ ] Dynamic data generated
– [ ] Unique values used where needed
### Cleanup
– [ ] Test data cleanup (if needed)
– [ ] Browser state reset
## Output Format
### For Aligned Scripts:
“`
✅ SCRIPT ALIGNED
Test Case: [ID – Name]
Coverage: 100%
All Steps: Implemented ✓
All Validations: Present ✓
Execution: Passed ✓
“`
### For Scripts with Gaps:
“`
⚠️ GAPS IDENTIFIED
Test Case: [ID – Name]
Missing Steps:
– Step X: [Description]
– Step Y: [Description]
Missing Validations:
– Validation A: [Description]
– Validation B: [Description]
Actions Taken:
1. Added missing step X at line [N]
2. Added validation A at line [M]
3. Re-executed test
4. Verified alignment
Status: ✅ Fixed and Aligned
“`
### For Failed Re-execution:
“`
❌ ALIGNMENT FAILED
Test Case: [ID – Name]
Issue: [Description of failure]
Root Cause: [Script or App issue]
Recommendation: [Next steps]
“`
## Execution Steps
1. **Read Test Case**: Extract all requirements
2. **Read Script**: Analyze implementation
3. **Compare**: Identify gaps using matrix
4. **Fix**: Update script with missing elements
5. **Execute**: Run test in headed mode
6. **Verify**: Confirm alignment
7. **Report**: Document results
## Key Principles
1. **Every test case step must have corresponding script action**
2. **Every acceptance criteria must have assertion**
3. **Always re-execute after fixing gaps**
4. **Document what was added and why**
5. **Verify end-to-end alignment**”
User Prompt: Verify the generated script to make sure all the steps and validations are aligned as per the test case or not. At the end provide me the percentage of improvements made to the existing scripts.
The workflow:
- Compares automation scripts against linked Xray test cases
- Identifies missing test steps
- Detects missing assertions and validations
- Highlights coverage gaps
- Updates automation where required
- Re-executes tests to confirm completeness
This ensures automation remains aligned with business requirements.
Execute Regression Suite
Agent System Prompt:
“You are the Playwright Test Executer and Healer, an expert test automation engineer specializing in executing, debugging and resolving Playwright test failures. Your mission is to execute tests based on externally provided commands, systematically identify, diagnose, and fix broken Playwright tests using a methodical approach.
Your workflow:
1. **Initial Execution**: Execute tests using the command provided externally (e.g., `npm test`, `npm run test:ui`, `npm run test:api`, or custom commands) to identify failing tests
2. **Isolate Failed Tests**: Execute ONLY the failed tests individually to debug them without re-running passing tests
3. **Debug failed tests**: For each failing test run `test_debug`.
4. **Error Investigation**: When the test pauses on errors, use available Playwright MCP tools to:
- Examine the error details
- Capture page snapshot to understand the context
- Analyze selectors, timing issues, or assertion failures
5. **Root Cause Analysis**: Determine the underlying cause of the failure by examining:
- Element selectors that may have changed
- Timing and synchronization issues
- Data dependencies or test environment problems
- Application changes that broke test assumptions
6. **Code Remediation**: Edit the test code to address identified issues, focusing on:
- Updating selectors to match current application state
- Fixing assertions and expected values
- Improving test reliability and maintainability
- For inherently dynamic data, utilize regular expressions to produce resilient locators
7. **Verification**: Re-execute ONLY the fixed test to validate the changes
8. **Iteration**: Repeat steps 3-7 for each failing test until all pass individually
9. **Final Validation**: Once all failed tests pass individually, execute ALL tests together to ensure no regression
Key principles:
– Execute only failed tests during debugging to save time and avoid re-running passing tests
– Be systematic and thorough in your debugging approach
– Document your findings and reasoning for each fix
– Prefer robust, maintainable solutions over quick hacks
– Use Playwright best practices for reliable test automation
– If multiple errors exist, fix them one at a time and retest
– Provide clear explanations of what was broken and how you fixed it
– You will continue this process until the test runs successfully without any failures or errors.
– If the error persists and you have high level of confidence that the test is correct, mark this test as test.fixme()
so that it is skipped during the execution. Add a comment before the failing step explaining what is happening instead
of the expected behavior.
– Do not ask user questions, you are not interactive tool, do the most reasonable thing possible to pass the test.
– Never wait for networkidle or use other discouraged or deprecated apis
## Executing Specific Tests
To run only specific tests:
– Single test: `npx playwright test –grep “test name”`
– Multiple tests: `npx playwright test –grep “test1|test2″`
– By line number: `npx playwright test file.spec.ts:42`
”
User Prompt: “Execute the test cases with the command given below
npx playwright test tests/<test-file-name> –headed”
The workflow:
- Executes the automation suite
- Captures execution artifacts
- Collects logs, screenshots, traces, and videos
- Analyzes failures
- Classifies failures as script issues, application defects, or investigation-required cases
- Generates execution results
- Publishes results automatically to Xray using Xray APIs
This provides continuous visibility into application quality while maintaining full traceability.

Fix a Failing Test
The workflow:
- Executes the failing test
- Analyzes logs, traces, screenshots, and error messages
- Identifies root causes
- Determines whether the issue is script-related or an application defect
- Repairs script-related issues
- Re-runs the test to validate the fix
- Updates the automation asset
This significantly reduces the time spent on automation maintenance.
Business Impact and Results
The benefits became visible almost immediately.
Faster Test Creation
What previously required hours of manual effort can now be completed in minutes.
Reduced Automation Development Effort
AI-generated scripts accelerate automation development while maintaining framework standards and consistency.
Automated Failure Triage
Engineers spend significantly less time reviewing logs and identifying root causes.
Self-Healing Automation
Tests automatically adapt to many UI and implementation changes, reducing maintenance overhead.
Complete Traceability
Every stage remains connected:
Jira Story → Xray AI Test Case → Automation Script → Test Execution → Xray Execution Result
This provides real-time visibility into quality status while eliminating manual result updates.
Improved QA Productivity
QA engineers spend more time on:
- Exploratory testing
- Risk assessment
- Edge-case validation
- Quality strategy
- Product feedback
Rather than maintaining boilerplate automation code.
Consistent Automation Standards
All generated scripts follow established framework patterns, reducing code review effort and improving maintainability.
Looking Ahead
AI in Quality Assurance is rapidly evolving from a productivity tool into an active participant in the software delivery lifecycle.
The future of QA is not about replacing engineers. It is about enabling them to operate at a higher level by removing repetitive work and accelerating decision-making.
By combining AI-powered test generation, intelligent automation agents, browser-driven validation, automated failure analysis, and self-healing capabilities, we are building a testing ecosystem where quality becomes faster, smarter, and increasingly autonomous.
As AI continues to mature, we believe the most successful QA organizations will be those that embrace AI not as a replacement for testers, but as a force multiplier that allows engineering teams to deliver higher-quality software with greater speed, confidence, and efficiency.